Pages

Tuesday, December 31, 2013

Differential Shrinkage Scarf - Postscript #2

I have finished the sample that I wrote about in my previous post and it has worked out very well. The combination of an open sett and a more restrained fulling process has produced the the effect that I was hoping for. The secret of success for this look is to get the shrinkage with just enough felting to hold the scarf together but no more.

As I have said before this was a lovely project to work on and I have learned enough to enable me to produce similar scarves in the future.

So, what's next?

Off the loom before fulling


After fulling


The model


Fulling Table

Sunday, December 29, 2013

Differential Shrinkage Scarf - Postscript #1

I have a little bit of warp left for the differential scarf so I have re-sleyed to 10 epi and shall weave a sample at 10ppi. I shall full very lightly so as to just shrink the merino a little bit; I want to try for something light and lacy.

I have just done a little bit and it is not easy. Weaving with such an open sett means that the slightest nudge will displace a weft thread; I am having to be very careful and gentle and have to confess that I am finding it a bit of a challenge.


This has been an interesting project which took a little longer that I planned but which was nethertheless very satisfying and great fun.


Now that the project is nearly over I have written up all my notes and calculations. I keep a manual notebook but I also find using a spreadsheet invaluable - here are some of the tables that I use;

Saturday, December 28, 2013

Stephanie's Scarf

The differential shrinkage scarf is finished and here is Stephanie wearing it! It was touch and go to get it finished and I actually had to take the scarf back after I had given it to her so that I could trim a few loose threads.


It is unlikely that it will be worn  for a few months. It is quite hot here in Australia at the moment.


These pictures show how the fabric turned out after fulling.


And here I am trying to be all arty!


Saturday, December 21, 2013

Differential Shrinkage Scarf - Fulling the sample


I have been having fun today felting the sample. We are having a little heatwave at the moment so it was very hot in the laundry whilst I was doing all this.

Sample as woven

This is the sample before I started the fulling process. It is 18" long and 16.7" wide. I twisted the fringe at one end and just left the other hem.


Washing up bowl and milk thermometer
Agitating the sample
First fulling

I used a washing up bowl to do the fulling and I borrowed my wife's milk thermometer to assist in temperature control.


The technique that I used was 5 minutes gentle agitation in hot water followed by 5 minutes agitation in cold water (from the cold tap which is 60F today).


This is the degree of fulling after three hot/cold cycles with hot at 120 F.

There is a nice bit of movement. The sample length has reduced to 14" (22% shrinkage) and the width has shrunk to 13" which is about the same percentage.


Second fulling
After the second fulling which was two more cycles at 14 F the sample was 13" long and 11.5" wide which is a 28% reduction in length and a 32% reduction in width.


Second fulling
This is another picture of the sample after the second fulling. I think that I want to achieve something between the two around 25% shrinkage.


Felting

Here one can see how much the merino has felted. Again, I think that this is a little bit too much. So, I shall repeat the process to get myself to stage one and then do little increments of temperature to get to the ideal 25%

This is all very exciting. It is too warm to do any more messing around with hot water so I shall  wait until tomorrow to start on the scarf. Time for a nice cup of tea and a bit of gentle fringe twisting


Thursday, December 19, 2013

Differential Shrinkage Scarf - Weaving finished

I have finished the weaving. As I have a bit of warp left I put in a stick heading before I cut the scarf off. It is now gently resting until I get to work on it tomorrow. I have to say that it looks extremely sleazy but I suppose it should at this stage.


Monday, December 16, 2013

Differential Shrinkage Scarf - Progress

We are having a very nice summer and what with camping, gardening and messing about in boats I have spent a lot of time Not Weaving. Momentum has picked up now, mainly because the scarf is intended as a Christmas present.

Sleying the reed
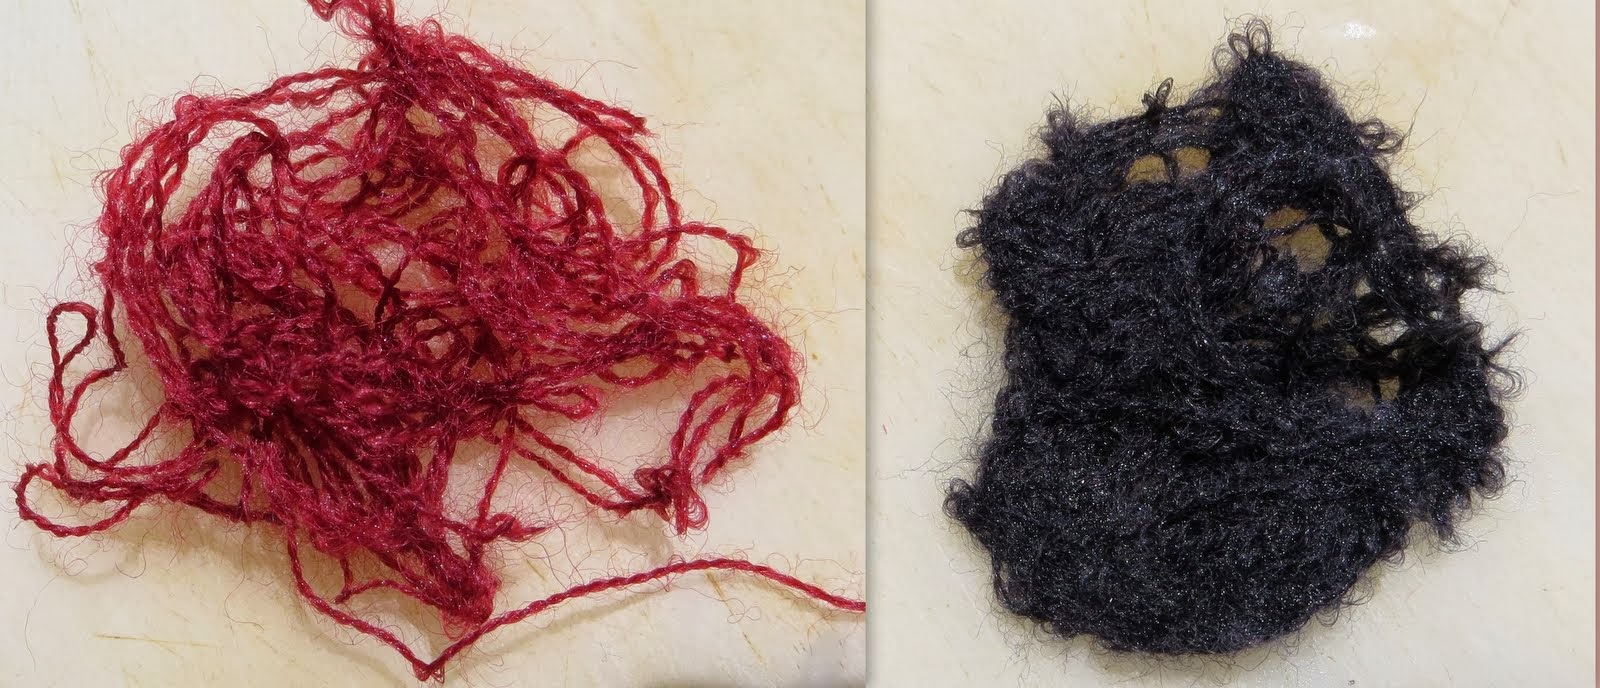
In a my last post I wrote about how I cleaned the reed. It ended up a nice dark grey colour which unfortunately was an almost exact match with the dark grey of one of my weft yarns. Needless to say I had a couple of sleying errors and they were close to the centre of the reed.

In the past I have balanced the reed on boxes when sleying; silly, it is much easier to hang it from the superstructure.


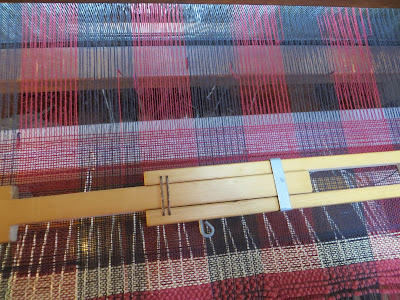
Open sett means see through cloth
When I started the weaving I had a problem because I found it difficult  to see the fell clearly and judge my beat. The set is very open (12 ppi for the Mora and 16 ppi for the Merino) so the cloth is see through with lots of visual distraction coming through from below.


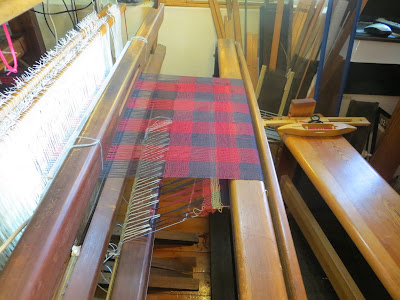
Three lights at the front of the loom
I put extra lighting onto the loom. The little clip on lights that I have put onto the beater uprights are invaluable - I use them all the time and move them around as needed


Light behind the beater
The sample

In addition to the three lights shown above there is a neon light (turned off in the photo) attached to the back of the top beater bar. This shines down and through the red giving a good view of the fell.


This is the sample. I have made it larger than I normally do because it will be needed for determining the amount of finishing that I will need to do to get the right degree of shrinkage and pucker.


Measuring 14 ppi 
 In theory I should be beating the red Mora wool to 12 ppi and the grey Merino to 16 ppi. Swapping every 2"proved too much for me so I have settled for 14 ppi throughout. I could probably have set the whole warp at 14 ppi.
Washers (nuts) in the boat shuttle


I normally use end feed shuttles but because this CB loom beater does not have a shuttle race on the bottom batten I decided to use lighter boat shuttles. I had a problem with the spools catching and snagging but a couple of nuts serving as washers has fixed the problem.


I am now well into the actual scarf having woven about 2' today in a couple of gentle sessions. I should make it for Christmas!


Tuesday, November 12, 2013

Rusty Reed

The best laid plans and all that but I finally found some time to wind the warp for the differential  shrinkage scarf, beam it and thread it. Apart from domestic distractions it took a bit of time because I managed to twist one of the warp chains and it took a lot of realignment. My only concern is that I don't know how I did it so I shall probably do it again.


Memo to self; check reeds before starting a project. I was ready to sley but found that my 12 dent reed wasn't wide enough. I found another 12 dent reed stashed away but it was in a bit of a state. So I assembled some wire brushes, emery paper and rust cleaner and set to with a will. The reed needed two applications of rust cleaner and a lot of rubbing and brushing; the results are remarkably good as the before and after pictures below show!


The rust removal product I used is called Dr Fixit. It comes from India and is formulated for the treatment of corroded steel (rebars is the technical term as I learnt from the tin) in reinforced concrete. I should write to the manufacturer to let them know that it is pretty good on reeds as well.


Thursday, October 31, 2013

Differential Shrinkage Scarf - Planning

I wove a differential shrinkage scarf 4 years ago and I can still remember the excitement when the yarns in my sample stated to shrink and pull everything into interesting shapes.


In planning this next project I have used  my notes from last time, the good stuff in Handwoven ( articles by Stefanie  Meisel are particularly relevant to this project) and the articles in the "puckers and poufs" section of
The Best of Weavers Fabrics That Go Bump with particular attention to the one by Liz Williamson.

The shrinking yarn of choice in most of the Handwoven articles is Jaggerspun 18/2 Merino. Because of the prohibitive costs of getting yarns posted from the US I was delighted to find that Yarn Barn in Melbourne stocks 2/20NM Merino.  My non shrinking yarn will be Borgs 20/2 Mora which I get from Glenora Weaving & Wool.

I took about a yard of each of these yarns, rolled them into a ball and the massaged them vigorously in hot water and plenty of soap. The Mora resolutely refused to cling to itself but the Merino formed a very satisfactory felted clump. That will do for sampling for the time being.

Based on my last scarf and the articles I shall allow for 25% shrinkage in length and 30% in width.
As for sett, I am going for 2/3rds of the plain weave sett. The warp length works out at 154" and the width will be 18".


The loom is ready, the yarn and warping wheel are waiting so lets get at it! 

Wednesday, October 30, 2013

Counterbalance Loom Modifications

The Brighton Honeycomb scarves are off the loom and waiting to have their fringes twisted and be tidied up and  washed. As I have six scarves at this stage I have bought myself a fringe twister. When the weather sorts itself out (it seems to be either very hot with the air filled with smoke from the bush fires or cold and stormy) I shall set myself up outside for a bit of twisting.

I have come across an Australian source of 20/2 NM  feltable wool and have bought a cone (elephant grey). I already have some non-shrinkable (Mora 20/2) so I am going to weave some differential shrinkage scarves. I can't use my Glimakra as I have a bit of warp left on it after completing the Brighton Honeycomb scarves. I have re-sleyed this for plain weave and plan to do some Monks Belt on it. So I will be using my Counterbalance loom for the shrinking scarves.

Based on how I found it the last time I used this loom I have made a couple of modifications. The loom had two pulleys mounted on a top beam. These pulleys support the two rollers that support the four shafts.

I have replaced the pulleys with a single top roller. I found that the pulleys were to prone to act independently of each other and not return to their original starting point after changing a shed.  In a previous post I quoted Peter Collingwood  "To ensure the shafts rise and fall without tilting, don’t just wrap their support cords around the rollers, but actually fix them to the rollers".  With the single top roller I can attach the cords which I couldn't do with the the metal pulleys.

The other thing that I have done is attach the top roller to the cross beam with turnbuckles so that I can precisely control the height of the harnesses. Texsolv is brilliant but can only be adjusted in half inch increments.  To do this I had to raise the height of the cross bar with a couple of blocks.


It all seems to be working but the final proof of the pudding will be when I get a warp on. I had a good look at the LeClerc CB looms when working all of this out. In my mind this was all going to be done is nicely finished wood but economy and practicality means that I have used a plastic pipe for the new top roller and a couple of yoga bricks to raise the height of the top beam. I will put a few cable ties on to hold it all together. If it works that will be fine but I really should have a look at getting a slightly more elegant solution.


Monday, October 14, 2013

Cape Breton Coverlet Patterns

Weaving the Brighton Honeycomb scarves is proceeding nicely; I am now on the third scarf where I am using  a yellow weft. For the second scarf I used the rib treadling and a deep copper coloured weft.

In my previous post I was writing about why I think that my CB loom will be good for overshot. I have also been thinking about what overshot I would like to weave. I was browsing through various drafts and documents when I came across a monograph Cape Breton Coverlet Patterns which I had downloaded ages ago and completely forgotten about. It was written by Lou Tate and is based on the research of Florence Mackley who collected coverlet drafts from the Cape Breton region. These drafts came across with the migrants from the Western Isles in the first half of the 19th Century. 


One of the seductive things about the internet is that one can wander down interesting lines of enquiry to fascinating places so I went via Lou Tate to the Kentucky Weaver and the Little Loomhouse but I managed to put these to one side for future exploration and drag myself back to the Cape Breton coverlets. 


It is a lovely paper with drafts, photograph, background information, ideas and practical information on using the patterns, drafts and drawdowns. The clip below of one of the pages gives the flavour of it.


My initial reaction on first reading was "They are drafts Jim but not as we know them "  but with a bit of application and following the explanations in the monograph and Mary Meigs Atwater's  pages explaining different systems of notation (The Shuttle-Craft Book of American Hand-Weaving, Chapter 12) I was able to work them out.

My rendition of the Snowdrop draft from above looks like this.
                       
One thing that I would love to find out is why, as far as I can discern, there is no remnant of coverlet weaving tradition in the western part of Scotland? Twills and tweeds, yes; but no coverlets. 

Thursday, October 3, 2013

Loom for weaving overshot


Whilst weaving the Brighton Honeycomb scarves my thoughts have been turning to what I should be doing next with my counterbalance loom.  I had decided some time ago that I would try some overshot on it and that in fact overshot would be better woven on the counterbalance than on a dobby loom.

My reasoning is that on a computerised dobby loom it is not that easy to vary what you are weaving from the draft that is being used by the software. This is fine when you know exactly what it is that you want to weave. When weaving overshot there are circumstances where the number of picks woven of a particular lift will depend on how well the pattern is squaring up which in itself is dependent of the grist and compressibility of the weft yarns.

The inestimable Mary Meigs Atwater explains it much better;
"In weaving - if it is intended to produce the pattern "as drawn in"- each block must be woven with the number of weft shots required to make it square. The number of weft shots required varies with the weight of weft-material used, so that it is impossible to write down treadling directions that will be correct for all materials. The weaver must use judgement in the matter." (The Shuttle-Craft Book of American Hand-Weaving- Mary Meigs Atwater, Page 116)
When sampling there is also a need for flexibility - if a particular treadling sequence is not to your liking then you want to switch to something else immediately. This flexibility is easy on a treadle loom, not so easy on a dobby loom.

I like reading what Mary Meigs Atwater wrote and I am fascinated by overshot patterns. I know that it sounds a bit silly but I feel that if I use my elderly counterbalance I shall somehow be a little closer to the weavers of the past. It's the "vibes" man. 

Saturday, September 21, 2013

Brighton Honeycomb

I like Brighton Honeycomb. It is some time since I wove some but I have a few scarves that are favourites, just the thing to wear when having a nap, admiring the view from the top of the Rockefeller Building or just off camping.

Carol Strickler (#21 & #22 - A Weavers Book of 8 Shaft Patterns) gives two treadlings, the second of which produces a rib effect (Black Scarf - Rockefeller). The left hand draft below is a copy from Strickler.

One of the nice things about Brighton Honeycomb is that if you thread your selvedge threads on shafts 3 and 6 you get a plain or basket weave selvedge. The draft on the right shows what I am weaving. It is the 8 shaft draft extended to 24 shafts with selvedges and header rows added.


I am currently working on the trial/sample area, sorting out my beat, the shuttle tension and the warp and selvedge tensions. I had one crossed warp thread which was easily fixed.  The warp is two close shades of orange and I will be using a red weft.


Weaving 8 shaft Brighton Honeycomb in a single or analogous colours is just a starting point for this structure. There is quite a lot of information on the web. I like Priyank Goyal's notes, and Posselt has some interesting things to say, particularly on the use of colour.

I am using a twill sett which seems to work fine for scarves. If I have room on this warp I shall re-sley to a looser set for a small sample - shawls perhaps?


Thursday, September 19, 2013

Selvedge Rollers

In an earlier post, Back of the loom, I showed some design possibilities for Selvedge Rollers. I have now come up with my version (Mark 1)  in which I have plagiarized a little bit from each of the ideas.

I bought two spinning wheel spools and mounted them on a long wooden dowel. The dowel is attached by four metal brackets to a narrow beam that sits in the currently unused mountings of the secondary warp beam. The selvedge threads are wound onto the spools and dynamic tension is applied by nylon line wrapped over the rollers and weighted with fishing sinkers.

 The system works but already I can see plenty of scope for improvement. This will all have to wait otherwise I shall never get going with some weaving. 

Wednesday, September 4, 2013

Threading with the AVL Cross Maker

I set out to thread a warp today on my 24S Glimakra but ran into problems. I had the threading cross on lease sticks suspended as usual  right behind the heddles. Note the cunning use of the snitch knot to get the lease sticks at the right height!


Normally reaching through the gap between the heddles (24 shafts worth of them) to pick up the next thread from the cross is fine but because I have slightly wrenched my shoulder playing tennis I found this tricky today.


My solution to the problem has been to move the threading cross to in front of the heddles. I have used the cross maker from my AVL warping wheel to act as a little set of lease sticks and the photograph shows the rather industrial way that I am holding it in place. The selected threads are easily slid of the ends of the sticks. I thread in blocks of four, selecting and grouping the correct heddles and then taking the threads off the cross. I still have to reach through to bring the threads into the correct position for threading but it this is much easier on the shoulder (and the eyes) than trying to get hold of threads that are 2 feet away.

I have a rubber band (not shown) that I put into place on the cross maker to hold the threads firmly in place. I put this on every time I get up from my sitting position which is the danger time for knocking things out of kilter. I take it off again when I am settled back down again and ready to resume threading.

The next photo shows the total set up. The ubiquitous milk crate ( I have seen a students bedsit completely furnished with these) is just the right height for a seat. The loom controller foot pedal is sitting on the knee beam and always remember to take your watch off before starting to thread.


I have a special threading draft that lifts each shaft in a block of four in turn. This is when I select the heddle. After I have threaded them I use the draft to lift all four shafts together so I can check that all is correct.


Monday, September 2, 2013

Ray's Scarf

                                                                                                                                                                                                              
We  went camping over the weekend at Crowdy Bay National Park . We met up with our friends who are members of a bushwalking group. They all shot off on some long walks  but I stayed close to the campsite and limited my activity to wandered off into the bush a couple of times and making a short foray along the beach. I positioned myself with camera, binoculars and did a bit of fringe twisting whilst letting nature come to me.


This scarf is one of the last three that I wove from a very colourful warp that has kept me happy from months.


Whilst there I caught up with Ray who I first met when we went camping at Knorrits Flat. On his travels around Australia Ray has collected wool in different conditions and quantities and from a variety of sources including derelict weaving sheds.  A friend spun this wool for him and lent Ray a loom on which he wove this scarf; his first bit of weaving for over fifty years. 


The colours are so natural and organic and the blending is lovely. I hope that the picture of the scarf draped over a tree and contrasting with the bark shows what I mean.

It just so happens that I am starting spinning classes next Saturday and I have already researched how to dye with Australian plants. I have even bought the necessary  mordants.

I think that seeing Ray's scarf will have given me the inspirational impetus to move a project from theory to practise.

.